Online Teaching Platform Tutorial
This tutorial explains how the new Teach-This.com online teaching platform works.
The tutorial can be completed in three ways:
1. You can watch the tutorial video.
2. You can read the tutorial guide below.
3. You can download and read the PDF tutorial guide at the bottom of the page.
Online Teaching Platform Video
Online Teaching Platform Guide
The Teach-This.com online platform helps you share resources with your students online and use them interactively. The platform has a variety of uses and can be used either in class or in online teaching situations with classes of varying sizes. In addition to the TeachThis materials, you can use your own resources on the platform.
The platform works by converting PDFs and images into digitized interactive resources that can be shared and used via a link. Students then use a set of interactive tools to complete and submit their work to you for marking and feedback.
The platform consists of a ‘My Resources’ dashboard where you upload and manage your materials. The ‘Preview and Share’ tool contains a collection of interactive tools that can be used for teaching and used to share materials with students. In 'Marking Mode', you can review and mark student submissions and provide direct feedback within the shared resource.
The platform is free to all Teach-This.com members who have either a 3-month, a 6-month or a 1-year online subscription. The platform is designed to work with desktop computers, laptops and tablets. Smaller devices are not recommended.
Contents

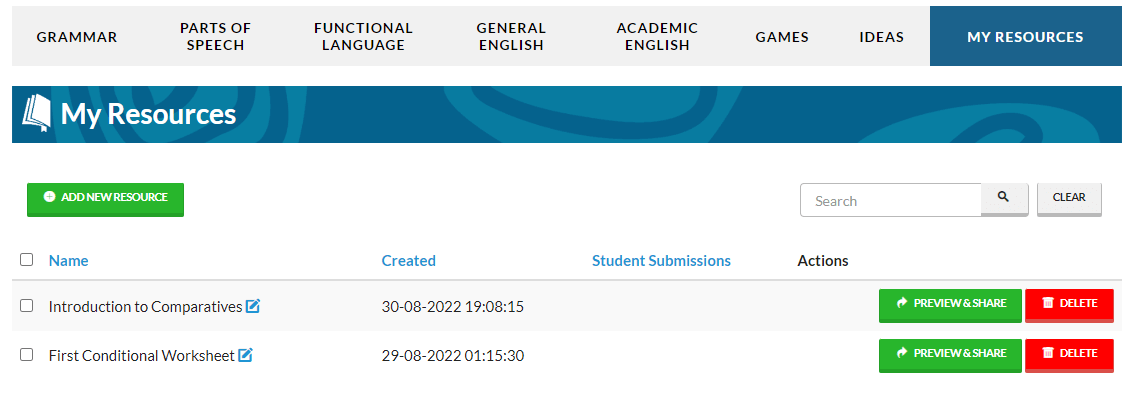
To access the online platform, log in to the site. Then, click the 'My Resources' button located on the right side of the main menu.
The ‘My Resources’ dashboard is the main management page for the online platform. It displays all the files you have on the platform along with the date and time they were uploaded, student submissions, the preview and share buttons, and the delete function. From this page, you can add, preview, share, and mark resources.
To get started, upload a resource to use on the platform by clicking the 'Add New Resource' button.

Drag and drop a PDF or image file into the box, and it will upload automatically.
You can also select and upload files stored locally on your computer by using the 'Click here' link.
Accepted file formats are PDFs, PNGs and JPEGs. It's not possible to upload Word documents. So, if you want to upload a teaching resource that is in Word format, convert it into a PDF and then upload it.
Once the file has been uploaded, it will show at the top of the ‘My Resources’ dashboard.
Click on the file name in the 'My Resources' dashboard to edit it if you wish. The file name will be visible to students when the resource is shared.

To preview and share a resource with students, click the 'Preview and Share' button. A new page will open displaying the complete resource with any teacher's notes and answer keys.
As the resource is fully displayed along with the interactive tools, you can use this page to teach, preview or review a resource with your students.
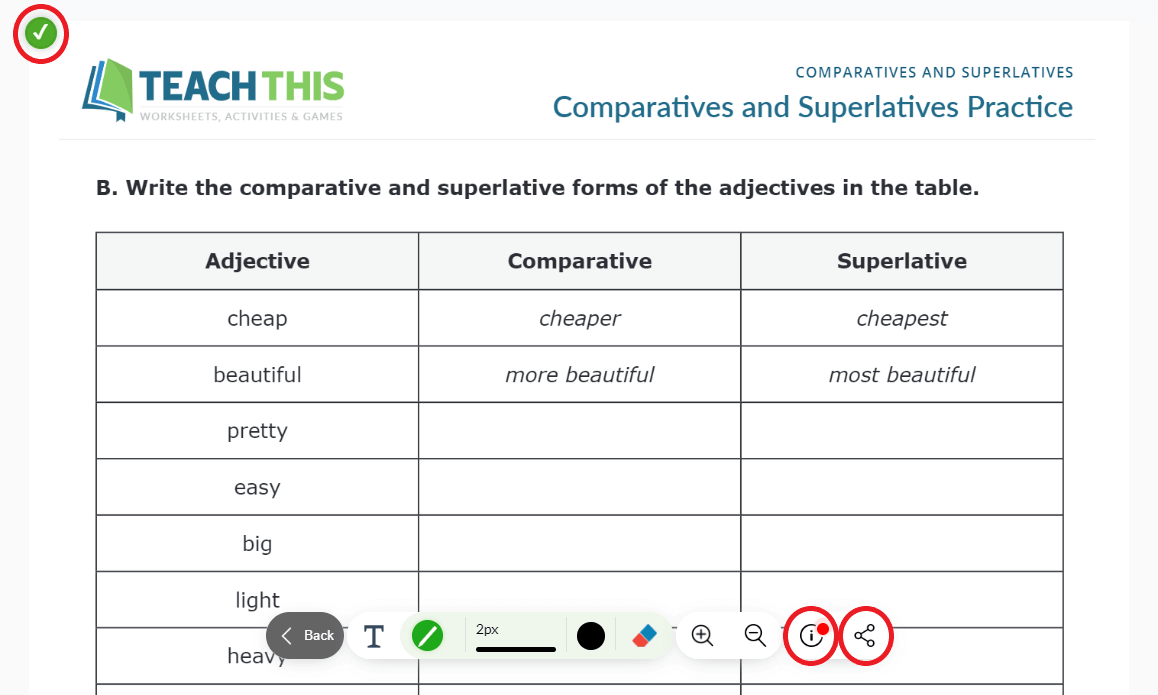
To share a resource, deselect any pages you don't want your students to see by clicking on the green tick icon in the top left corner of the page. When a page has been successfully deselected, it will appear faded out.
Once you have selected the specific pages you want to share with your students, navigate to the toolbar at the bottom of the page.
From here, you can include any additional instructions and share the resource with your students.
To add instructions or shared notes, click the ‘Information’ icon on the right side of the toolbar which will bring up a text box where you can type a shared message to the students. Then, click 'Save' to keep the message. To close the text box, click the ‘Information’ icon again.
To share the resource with students, click on the 'Share' icon. Click "Copy link" and send the link to your students via email, online chat, etc. Remember to deselect any teacher's notes or answer keys before sharing the link.
To go back to the 'My Resources' dashboard, click the ‘Back’ button to the left of the toolbar.

When a student clicks on the link shared by the teacher, the resource will open in their browser and only show the pages you have selected, including any instructions added as notes.
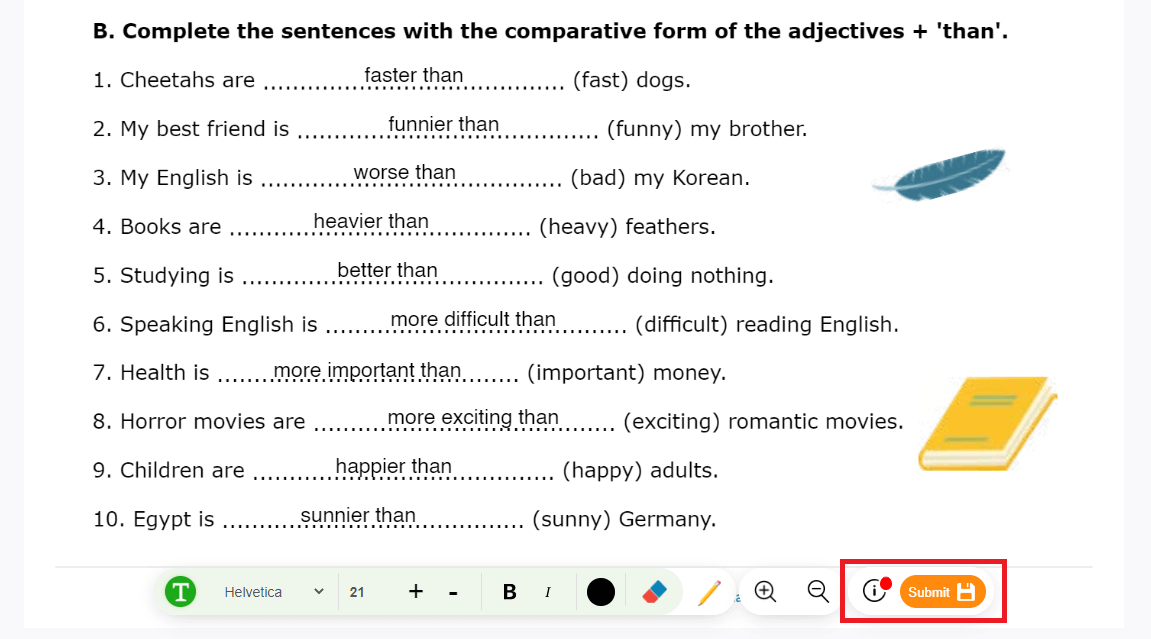
Students then complete the exercises using the text and draw tools.
When a student has finished, they click the ‘Submit’ button and enter their name and email address and an optional message. They then click the 'Submit' button, and their work will automatically be submitted to you for marking.
After submitting their work, an email icon will appear in the students’ toolbar. By clicking on this icon, students can save a link to their work, so they can view or resubmit their work later. Students can choose to copy the link to a clipboard or have the link sent to their email address.
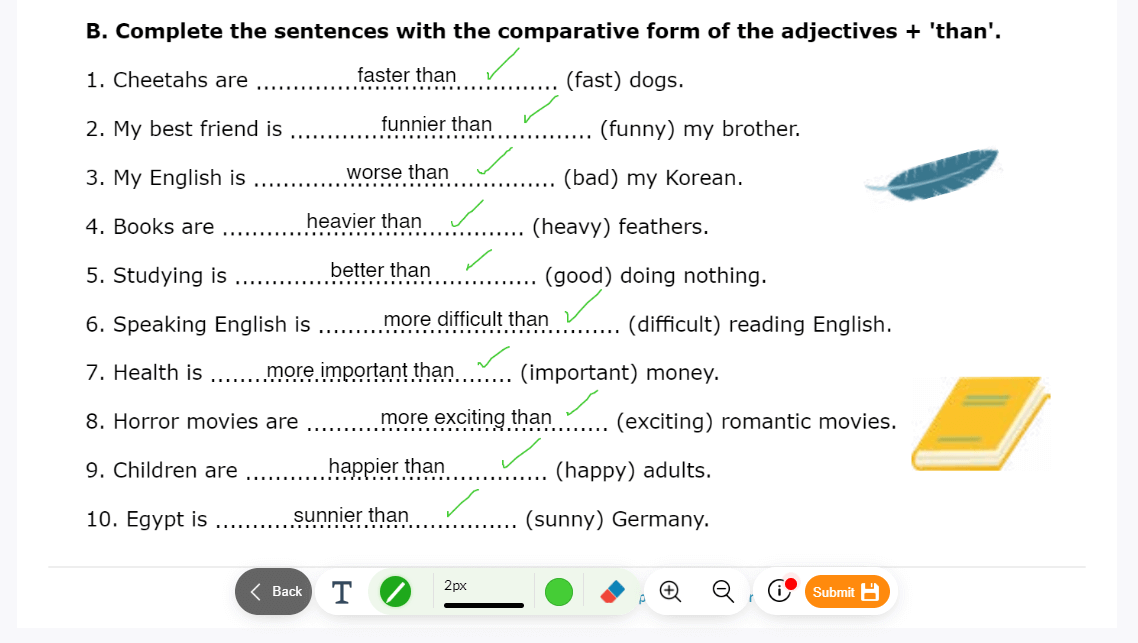
After a student has submitted their work and it has been marked, if they refresh the page or open the link again, the marked items and comments from the teacher will show.

The toolbar functions work the same in Preview, Student View and Marking Mode.
To add text, click on the T icon on the left. Navigate your I-cursor to the line where you want to add text, left-click and start typing.
If the text is not aligned correctly, click the ‘Direction’ icon in the top right corner of the text box to adjust the position of the typed text.
To edit any typed text, click on the text and make any required changes.
Next to the T icon, you can also choose from various font types, sizes and colours.
To draw, select the pencil icon. The draw function has options for changing the thickness and colour of lines.
To erase a text or a drawing, you can use the erase tool. Choose the text or draw tool and then click or swipe over the text or drawing and left click to erase.
To make a resource more readable, the toolbar also includes a zoom-in and zoom-out function.
On the left, there is a thumbnail panel which you can use to quickly scroll to another page.

On the 'My Resources' dashboard, you will see all the student submissions for each resource.
When submissions for a resource have been received, a ‘View’ button will appear in the student submissions column. The total number of submissions received thus far is indicated in red.

Clicking the 'View' button opens the Marking page for that resource, displaying all student submissions. Here you can see the time and date of each submission along with the student’s name and email address, and whether it has been marked or not.
To mark and review a submission, click the ‘View / Mark’ button and the student’s work will show.

When a submission has been marked, click the 'Submit' button to save the marking and any optional feedback included in the notes. Once you click ‘Submit’, the student will see the marked work after they refresh or reopen the page.
To move on to the next submission and continue marking, click on the 'Back' button.
Any changes made to the resource by either the student or the teacher can be automatically viewed by either party by doing a simple browser page refresh.
If you have any questions about the online platform, please don't hesitate to contact us via the website.
PDF Tutorial Guide
To download a copy of the Teach-This.com online platform tutorial, please click the link below.
Online Teaching Platform Guide.PDF
Disclaimer: Please note the Teach-This.com website, its software and all content found on it are provided on an “as is” and “as available” basis. TeachThis Limited will not be liable for any loss, whether such loss is direct, indirect, special or consequential, suffered by any party as a result of their use of the Teach-This.com website, its software or content.
Should you encounter any bugs, glitches, lack of functionality or other problems on the online platform, please let us know immediately so we can rectify these accordingly. Your help in this regard is greatly appreciated.

